Have you ever wondered how SQL queries are sent over wire (or more precisely a TCP connection) to the database and how it responds? How is that connection established and what protocols are used?
Last week, I was learning about the TCP/IP model and thought of exploring a bit more, and down the rabbit hole I went on a fascinating journey.
There are a few ways to connect to PostgreSQL:
- A GUI-based client like DBeaver or PgAdmin.
- An ORM like SQLAlchemy, which under the hood uses a database adapter like psycopg2.
- An adapter like psycopg2 which allows you to run raw SQL queries programmatically in Python.
- Using
psqlon the CLI. - Running raw SQL queries over a TCP connection.
If you notice the order of the list, the abstraction is in decreasing order from top to bottom. The first one is the most abstracted way of interacting with the database, while the last one is the most low-level way like we are going to do.
When using a database adapter like psycopg2 or even the psql CLI, you are abstracted from the actual TCP connection. The client has an innate understanding of the PSQL protocol and provides a high-level API to interact with it.
In this blog, we will assume limited knowledge of the PSQL protocol, capture the TCP segments, and craft our own messages by understanding the captured segments and try to understand how the TCP connection is established, how the SQL queries are sent over the wire and how the responses are received. and what they mean. This will allow us to understand the abstraction better we have been using all this time.
Word of caution before we begin, this is a crude and somewhat stupid way of doing it, and no one does it like this for very good reasons but for the sake of exploration, we will. Shoutout to ChatGPT for helping me understand the PSQL protocol and all the help in debugging as well as the Open Source Community for all the tools and resources.
I am using zsh on Mac but other shells and platforms should support the commands as well. We will be also using a standard PostgreSQL container running on Docker, Python 3.13 and Wireshark to capture the TCP segments & debugging.
To capture the TCP segments, we need to start Wireshark and begin listening on the loopback interface, i.e., lo0, and filter the traffic by port for TCP with tcp.port == 5432.

Next, we run a PostgreSQL instance on docker and connect with it through terminal, something we all are familiar with.
$ docker run --name psql \
  -e PostgreSQL_USER=postgres \
  -e POSTGRES_PASSWORD=mysecretpassword \
  -d -p 5432:5432 postgres

$ psql -h localhost -U postgres

# Password for user postgres:
# psql (17.2, server 16.3 (Debian 16.3-1.pgdg120+1))
# Type "help" for help.

postgres=# SELECT 4 + 3;

?column?
--------
      7
(1 row)

postgres=# exit
With this, we have captured entire communication between the psql client and the Postgres instance on Wireshare.
At the network layer
This is how the communication with the Postgres instance looks at the network layer.
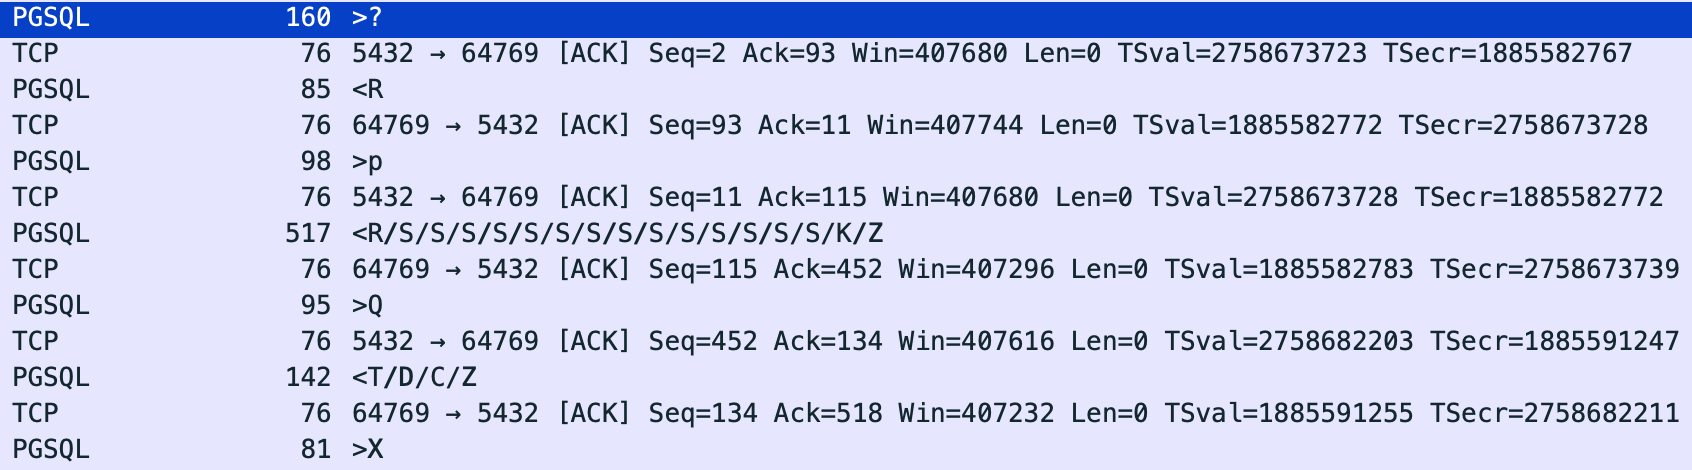
Confusing? Let’s break it down one by one.
-
>?is the initial request i.e. “startup message” containing the username etc, we send to connect with the PostgreSQL once the TCP connection is established i.e. 3 way handshake is done.
-
<Ris Authentication Request sent back by PostgreSQL -
>pis the response i.e. the password we enter upon the prompt in the CLI -
<R/S/S…First R is the Authentication response along with the 4-byte authentication code where 0 means success, followed by system informations from the PostgreSQL such as timezone and server version etc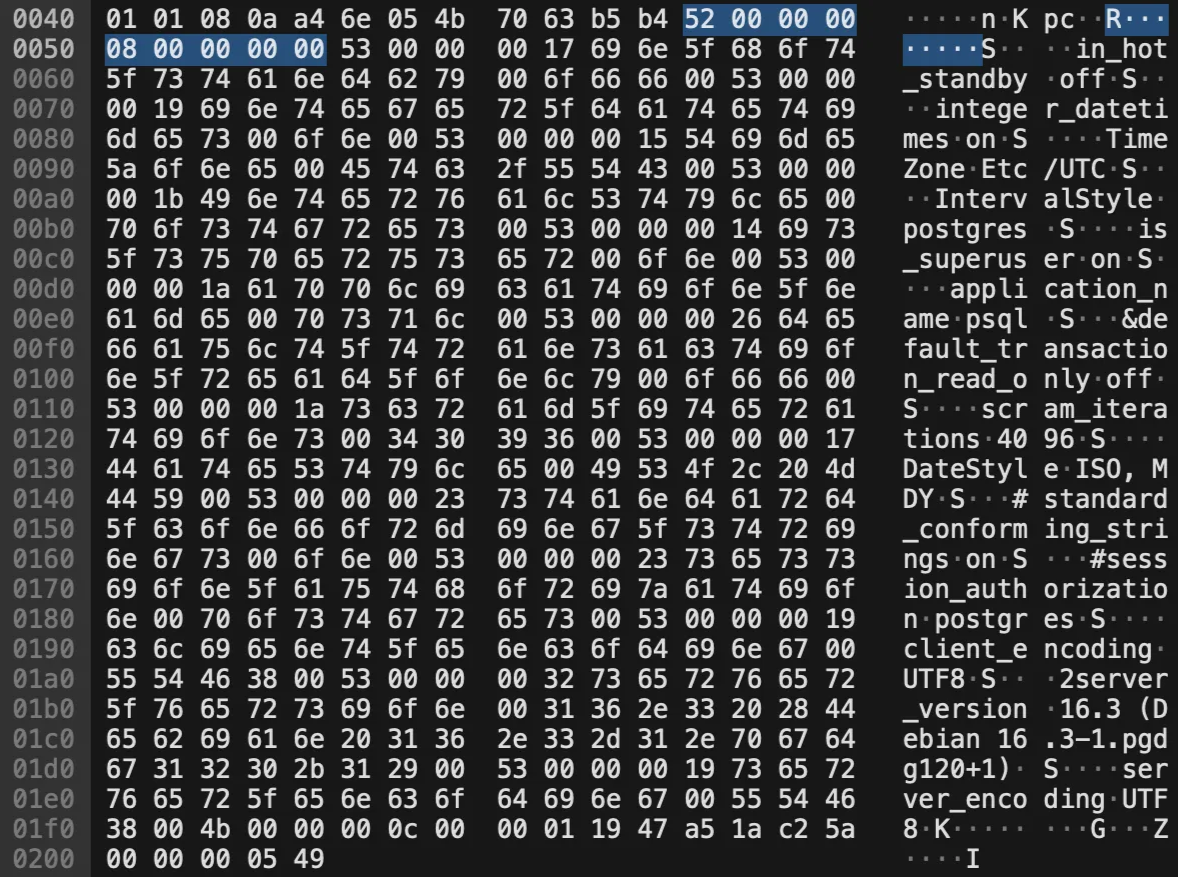
-
>Qis the SQL query we send to Postgres i.e.SELECT 4 + 3; -
<T/D/C/Zis the response of the query.
We can notice 7 in as the string representation and corresponding hex code of 37.
16 * 3 + 7 = 55, 55 in ASCII is “7”.

If you are wondering what the P and Q are, they are controls signals specified in the PostgreSQL protocol.
| Message Type | Description |
|---|---|
Q |
Simple Query |
P |
Parse a statement |
p |
Password Message (Authentication Response) |
T |
Row Description |
D |
Data Row |
Z |
Ready for Query |
R |
Authentication Request |
Binary, Hexadecimal and ASCII
Before we dig deeper to understand what the cryptic message above meant, let’s understand the relationship between binary, hexadecimal and ASCII.
We all know that computers understand binary, but we humans don’t. We use ASCII to represent the binary data in a human-readable format. ASCII is a standard to represent characters in computers. Each character is represented by a decimal number, and each number has a corresponding ASCII character. Each decimal number can be represented in binary, and each binary number can be represented in hexadecimal.
For example, the ASCII code for A is 65, and for a is 97. The binary representation of 65 is 01000001 and for 97 is 01100001. The hexadecimal representation of 65 is 41 and for 97 is 61: A = 65 = 41 & a = 97 = 61 .
0s and 1s are too long to write and read, so we use hexadecimal to represent binary data. Hexadecimal is a base-16 number system that uses 16 symbols (0-9 and A-F) to represent numbers. Each hexadecimal digit represents four bits, also called a nibble and we use hexadecimal to be a more human-friendly and visually concise representation of the binary data. We can convert the hexadecimal to decimal and then to ASCII.
In the command line, we can use utilities like xxd and hexdump to convert the ASCII to hex and vice versa.
$ echo -ne "user\0postgres" | hexdump -C
# 00000000  75 73 65 72 00 70 6f 73  74 67 72 65 73           |user.postgres|

# 75 73 65 72 00 70 6f 73  74 67 72 65 73 hex
# 117 115 101 114 0 112 111 115 116 103 114 101 115 decimal
# u s e r \0 p o s t g r e s ASCII
Don’t worry, we can do similar conversion in the browser using javascript; go ahead, try this on your console!
const message = 'user\0postgres';

const hex_message =
				message
				// Split the string into an array of characters
				.split('')
				.map(
						// find the ASCII code in decimal,
						c => c.charCodeAt(0).
										// convert to hexadecimal and then pad if need be
										toString(16).
										padStart(2, '0')
						)
			.join('')

// => 7573657200706f737467726573

hex_message
	.match(/.{1,2}/g) // Break into bytes
	.join(' ')

// => '75 73 65 72 00 70 6f 73 74 67 72 65 73'
Show me the code!
Now, we seen how the messages are sent over the wire when we communicate with PostgreSQL and how binary and hexadecimal works. Let’s try to run a SQL query over a raw TCP connection.
We will run a simple SQL query on TCP connection without any adapters. For this, we will try to to mimic message from the TCP segments we caught in wireshark and carefully craft our own messages based on the them.
At First, I attempted to establish a TCP connection using nc, that is netcat. It can be used to send and receive messages over a network connection. You can even send HTTP requests using nc like this.
$ nc -v api.open-notify.org 80

# Connection to api.open-notify.org port 80 [tcp/http] succeeded!

GET /iss-now.json HTTP/1.1
Host: api.open-notify.org

# Press Enter twice after the Host line

# HTTP/1.1 200 OK
# Server: nginx/1.10.3
# Date: Sun, 09 Feb 2025 10:37:48 GMT
# Content-Type: application/json
# Content-Length: 115
# Connection: keep-alive
# access-control-allow-origin: *

# {"iss_position": {"latitude": "-45.9111", "longitude": "-134.3420"}, "timestamp": 1739097468, "message": "success"}
Here, we are piping the “startup message” encoded in binary to nc that establishes a connection with PostgreSQL and then pipes the output to xxd.
$ echo -ne '\x00\x00\x00\x54\x00\x03\x00\x00\x75\x73\x65\x72\x00\x70\x6f\x73\x74\x67\x72\x65\x73\x00\x64\x61\x74\x61\x62\x61\x73\x65\x00\x70\x6f\x73\x74\x67\x72\x65\x73\x00\x61\x70\x70\x6c\x69\x63\x61\x74\x69\x6f\x6e\x5f\x6e\x61\x6d\x65\x00\x70\x73\x71\x6c\x00\x63\x6c\x69\x65\x6e\x74\x5f\x65\x6e\x63\x6f\x64\x69\x6e\x67\x00\x55\x54\x46\x38\x00\x00' | nc -v localhost 5432  | xxd

# Connection to localhost port 5432 [tcp/postgresql] succeeded!
# 00000000: 5200 0000 1700 0000 0a53 4352 414d 2d53  R........SCRAM-S
# 00000010: 4841 2d32 3536 0000                      HA-256..
With nc, debugging and sending follow-up messages proved challenging as the connection terminated after receiving a response from PostgreSQL.
Consequently, I decided to adopt a more structured and developer-friendly approach by creating a Python script.
# https://gist.github.com/kshitijpurwar/0d8e1478d6b8037ca48df2e2039eeffa
psql_startup_message = '\0'.join([
'user', 'postgres',
'database', 'postgres',
'application_name', 'psql',
'client_encoding', 'UTF8'
]);
print(psql_startup_message)
# Each character is represented by a byte
print(len(psql_startup_message)) # 74
# create a socket object
sock = socket.socket(socket.AF_INET, socket.SOCK_STREAM)
sock.connect((PSQL_URL, PSQ_PORT))
# 4 bytes each for the message length and protocol version # 0000005400030000
# 2 bytes for extra null bytes for the whole message i.e. at the end \\0\\0
# Total bytes = 4 + 4 + 74 + 2 = 84 i.e. T
MESSAGE_PROTOCOL_MAJOR_VERSION = 3
MESSAGE_PROTOCOL_MINOR_VERSION = 0
complete_startup_message = (
(len(psql_startup_message) + 10).to_bytes(4, "big")
+ MESSAGE_PROTOCOL_MAJOR_VERSION.to_bytes(2, "big")
+ MESSAGE_PROTOCOL_MINOR_VERSION.to_bytes(2, "big")
+ psql_startup_message.encode(ENCODING)
+ b"\0\0"
)
sock.sendall(complete_startup_message)
response = sock.recv(1024) # 1024 is the buffer size
divider()
pretty_print_hex(response)
# Output
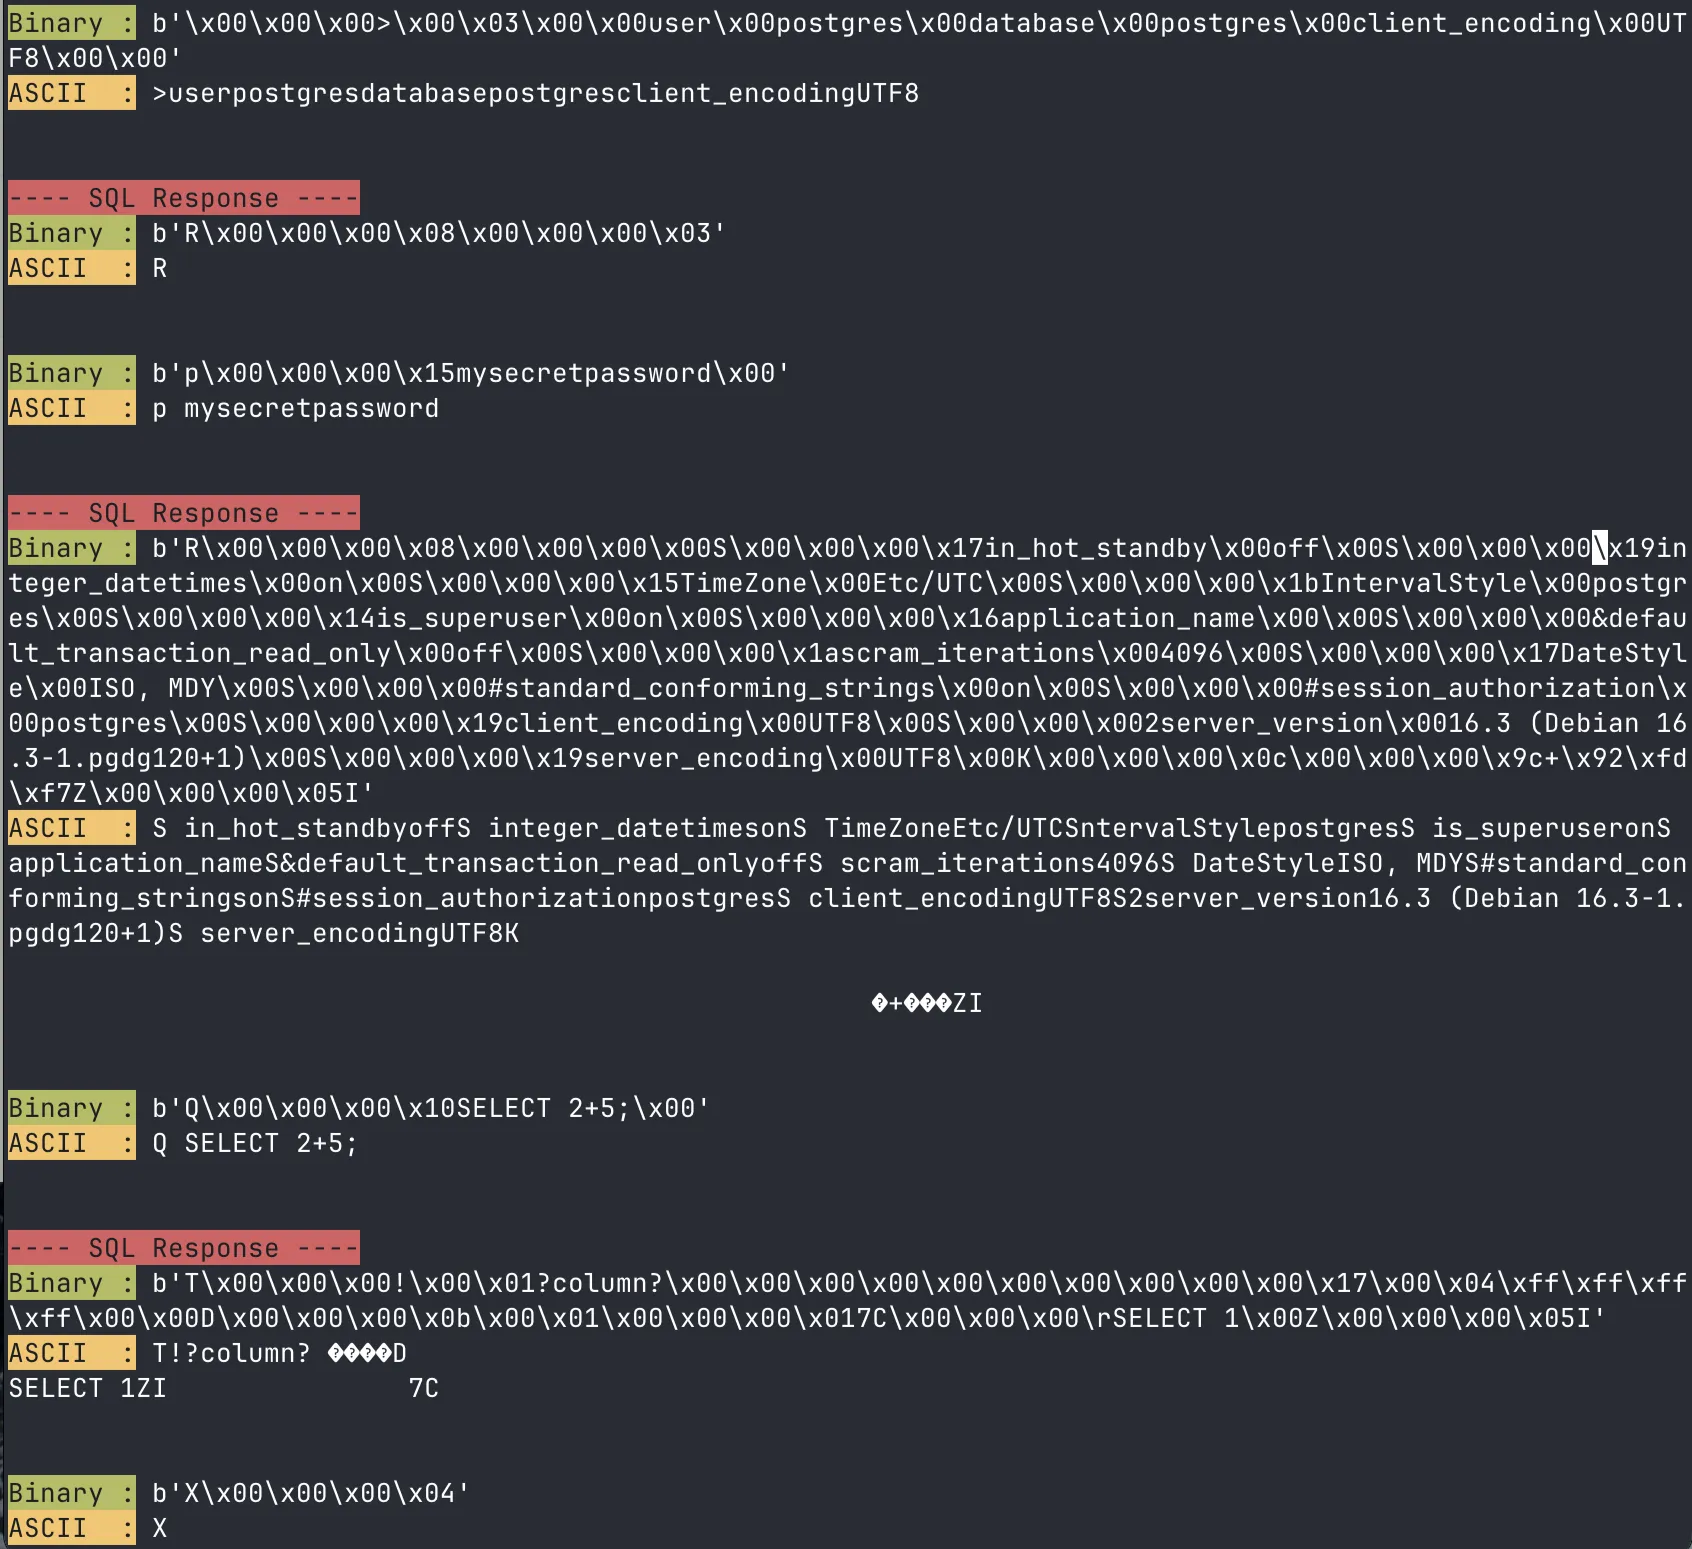
# Binary : b'\x00\x00\x00T\x00\x03\x00\x00user\x00postgres\x00database\x00postgres\x00application_name\x00psql\x00client_encoding\x00UTF8\x00\x00'
# ASCII : Tuserpostgresdatabasepostgresapplication_namepsqlclient_encodingUTF8
# ---- SQL Response ----
# Binary : b'R\x00\x00\x00\x17\x00\x00\x00\nSCRAM-SHA-256\x00\x00'
# ASCII : R
# SCRAM-SHA-256
# Binary : b'p\x00\x00\x00\x15mysecretpassword\x00'
# ASCII : pmysecretpasswordWhat is SCRAM-SHA-256?
SCRAM stands for Salted Challenge Response Authentication Mechanism.
Just like we never store the plaintext password for Authentication but it’s hash and salt. We do something similar here to make sure the the password for the postgres instance can’t be read over the wire in plaintext. Instead of transmitting the actual password in plaintext, SCRAM combines a salt and iterative SHA-256 hashing so the client can prove it knows the password without revealing it.
To learn more about this topic, you can refer to this great talk.
To simplify connecting with the PostgreSQL instance and avoid the tedious steps of SCRAM Authentication, I made the following changes in the PostgreSQL configuration. These changes are particularly to keep this blog short, especially the authentication part, replacing SCRAM-SHA-256 with basic plaintext password.
However, these are not recommended for a production (or even a development) environment at all.
$ docker exec -it psql bash

$ cat /etc/issue
# Debian GNU/Linux 12 \n \l

# Install Vim (optional)

$ apt update
$ apt install vim

$ vi /var/lib/postgresql/data/pg_hba.conf

# Edit this line from
# host    all    all    all    scram-sha-256

# To
# host    all    all    all    password

$ docker restart psql
When we send the startup message again, we get successful response and an authentication request with plaintext password method (authentication code 03 i.e. AuthenticationCleartextPassword).
$ echo -ne '\x00\x00\x00\x54\x00\x03\x00\x00\x75\x73\x65\x72\x00\x70\x6f\x73\x74\x67\x72\x65\x73\x00\x64\x61\x74\x61\x62\x61\x73\x65\x00\x70\x6f\x73\x74\x67\x72\x65\x73\x00\x61\x70\x70\x6c\x69\x63\x61\x74\x69\x6f\x6e\x5f\x6e\x61\x6d\x65\x00\x70\x73\x71\x6c\x00\x63\x6c\x69\x65\x6e\x74\x5f\x65\x6e\x63\x6f\x64\x69\x6e\x67\x00\x55\x54\x46\x38\x00\x00' | nc -v localhost 5432 | xxd

# Connection to localhost port 5432 [tcp/postgresql] succeeded!
# 00000000: 5200 0000 0800 0000 03                   R........
The xxd at the end takes the output from nc through pipe allowing us to read the binary output from the postgres server. Let’s run this “startup message” through xxd to see what it means.
$ echo -ne '\x00\x00\x00\x54\x00\x03\x00\x00\x75\x73\x65\x72\x00\x70\...' | xxd

# 00000000: 0000 0054 0003 0000 7573 6572 0070 6f73  ...T....user.pos
# 00000010: 7467 7265 7300 6461 7461 6261 7365 0070  tgres.database.p
# 00000020: 6f73 7467 7265 7300 6170 706c 6963 6174  ostgres.applicat
# 00000030: 696f 6e5f 6e61 6d65 0070 7371 6c00 636c  ion_name.psql.cl
# 00000040: 6965 6e74 5f65 6e63 6f64 696e 6700 5554  ient_encoding.UT
# 00000050: 4638 0000                                F8..
This looks familiar to the what we do using the CLI. We are sending the user, database, encoding and the application name, along with size of the message in the beginning and protocol version. This combination uniquely identified the type of the request to psql i.e. startup message.
As confusing as it may sound, the T here represents the length of the message. Let’s learn how, 54 converted to decimal from hex is 5 * 16 + 4 = 84 and converted to ASCII, 84 stands for T.
String.fromCharCode('0x54')
# 'T'

parseInt(54, 16)
# 84

String.fromCharCode(84)
# 'T'
PostgreSQL Startup Message Format
PostgreSQL uses a custom binary protocol to communicate with the client. We discussed some bits and pieces, earlier in the post with message types.
0000   00 00 00 54 00 03 00 00 75 73 65 72 00 70 6f 73   ...T....user.pos
0010   74 67 72 65 73 00 64 61 74 61 62 61 73 65 00 70   tgres.database.p
0020   6f 73 74 67 72 65 73 00 61 70 70 6c 69 63 61 74   ostgres.applicat
0030   69 6f 6e 5f 6e 61 6d 65 00 70 73 71 6c 00 63 6c   ion_name.psql.cl
0040   69 65 6e 74 5f 65 6e 63 6f 64 69 6e 67 00 55 54   ient_encoding.UT
0050   46 38 00 00                                       F8..
A PostgreSQL startup message is the first packet sent by the client to the server when establishing a connection. It includes details such as the protocol version and connection parameters as follows:
- Message Length (4 bytes): Total length of the message, including these 4 bytes
00 00 00 54 - Protocol Version (4 bytes): Specifies the protocol version
00 03 00 00.- Major:
3 - Minor:
0
- Major:
- Key-Value Parameters (74 bytes): Sequence of key-value pairs for:
- user: postgres
75 73 65 72 .... - database: postgres
64 61 74 61 62 61 73 65 ... - appplication_name : psql
61 70 70 6c 69 63 61 ... - client_encoding: utf-8
63 6c 69 .... - Each key-value pair is a null-terminated string (
key\0value\0).
- user: postgres
- Terminator (1 byte): A final null byte (
\0) indicates the end of the message.
Running the Python Script
In this script, we are communicating with the PostgreSQL server using the binary protocol as specified in the documentation on a raw TCP socket. We are sending and receiving the raw bytes from the server without using any libraries or drivers.
We open a socket connection to the PostgreSQL server, and once the TCP connection is established, we send the startup message to initiate the conversation. This startup message contains the user, database, and client encoding information. As a reply to our startup message, we receive the password request from the server. Here receive, R…03 i.e. authentication by plaintext since we replaced SCRAM-SHA-256.
We then, send the password to the server and receive the successful authentication response along with a whole lot of system information. After successful authentication, we send the SQL query to the server and receive the query result from the server. Finally, we send the termination message to the server and close the socket connection.
There are few important things to note in this script.
-
We are using
.encode(ENCODING)to convert the string to bytes using the UTF-8 encoding. -
Another important point is how we are calculating the length of the message and prepending it along with the request because if the length are not provided or not calculated correctly, it may be malformed request and the server might not be able to process it.
-
"21".to_bytes(4, "big")converts the integer to bytes into a length of 4 bytes in big endian format. The big parameter specifies the byte order.The "big" byte order means that the most significant byte is at the beginning of the byte array. Eg "21" in big endian and 4 bytes can be represented
b'\x00\x00\x00\x15'and in little endian it would beb'\x15\x00\x00\x00'. -
We have
pretty_print_hexfunction that prints the binary and ASCII representation of the hex string in green and yellow color respectively. When we decode the bytes into a string using the UTF-8 encoding, we use theerrors="replace"parameter to replace the any characters that can not be decoded with the Unicode replacement character i.e. a �.
Apart from these points, the code in itself is self documenting and straightforward. It can be used as a starting point for a crude driver for PostgreSQL where one could add more functionality to handle different types of messages and responses from the PostgreSQL server following the protocol. But, why bother when we have so many great tools for that!
Hope you had as much fun playing with SQL over the TCP connection as much as I had writing and learning about this. If you have any feedback, doubt or spot a mistake, please feel free to reach out to me.
There are many concepts such big endian, little endian, TCP/IP model, Wireshark, ASCII, xxd, hexdump etc, that I have not covered much in this post. If you are interested in learning more about these topics, I do recommend checking them out on the internet. I won’t suggest any since LLMs and Google would a far better job than I would.